Tuesday, June 29, 2010

Push Pins

I love making covered buttons. It's so easy but they looks really impressive when they are done.

Here is how to make covered button's and turn them into push pins.

What you'll Need:
A covered button kit- Jo Ann Fabric
Shank Remover- (forgot this puppy in the supplies picture above sorry)
E6000 Glue
Fabric of your choice
Push pin posts


First: Just follow the instructions on the back of the covered button kit. Easy peasies.


Carefully tuck fabric edges under covered button back

Now push down hard with the pusher thingy in the covered button kit

Pop it out!
You are done with step one.

Now

Dab a bit of glue on the push pin post and glue it to the covered button. Wait a couple of hours for it to set maybe even overnight and then you are done!

Really swell!


Have fun!

Sunday, June 27, 2010

Vintage Bulletin Board

I have just finished my vintage bulletin board. I was so tired of looking at the same old bulletin board. But I have been twirling my hair trying to decide what to do.


I didn't want to use store bought paper as the backing, what's the point? You cover it up anyway. And I did want to use the same old bright fabric you see everywhere. I also didn't want to spend a lot of money, so I went with what I had.

I'm pleased with the result and I'm in such a hurry to show you, that my photos don't do it justice because its dark outside. Lighting is everything ( I sound like I know what I am talking about and I don't).

If you would like to toss one of these babies together here how:

Rounded up a plain bulletin board, burlap, the large weave will hide the constant push pin marks.  Vintage paper, I used  newspapers from 1939 but you could use book pages, magazines, sheet music, anything you want that has that aged look. Next find your trusty glue gun, and Mod Podge.

NOTE: For pushpins I used vintage handmade fabric push pins~ tutorial tomorrow on that. Once you start making those babies you won't want to stop.  

This is so simple its scary.
First lightly sand down the frame of your boring old bulletin board.

Next put a coat of Mod Podge on the frame and press your paper to the frame. When dry cut the excess paper. Then Mod Podge over the vintage paper to seal it on the frame.

After the frame is done cut burlap to fit the cork board and fray the edges (shown above). Apply a thin line of hot glue around the cork edge and press the burlap down. This will stop the burlap from fraying and set it in place. 

Voila!  You are done. 

Now decorate with you favorite push pins. Funky or vintage doesn't matter. Either will look great. 


Tomorrow a tutorial on push pin making.   

Thursday, June 24, 2010

Keeping The Boys Of Summer Busy And Giving Back Some

Today we did our first stint into the volunteer arena. We bagged apples for the Oregon Food Bank. It was great. Very well organized and the work wasn't too hard for our little ones- 8 and 9 year olds.

We bagged a total of 1,486 lbs. of apples. They estimate 1.3 lbs. a meal which equates to 1,143 meals for hungry families. 

The boys had a great time. I highly recommend it.  

Just call your local food bank and sign the kids up. They learned a lot about who has been needing the food and how important it is especially in today's economy.

Wednesday, June 23, 2010

Color Wash


I was bored with my fingernail polish colors and wanted something different but didn't want to spend 8.50 like I love to do when feeling extravagant so I settled for a cheap 'o brand and added it to my OPI. I mixed them on a plate and used the wand from the less expensive brand to do the mixing.

The color was just what I wanted. A unique color, like the flowers in my backyard.

Hint: paint where it is cool so you have more time to work with the quick drying pigment.

I would show you my feet but no one should be subjected to that.

Get funky with the colors.  I may try green and blue next.

Is there away to do tie-dye? I will have to think about that one.


Tuesday, June 22, 2010

Verdant Oasis Or Was It?


In my never ending attempt to keep my boys busy (only three days into Summer break mind you) we took a walk. As we meandered through the lovely fields, down green paths, over wooden bridges,  an ever increasing familiar sound fluttered my way. One which made me walk. Very fast. Back to the car. 

It was the sound of Jack starting a sneezing fit which, by the way, didn't stop until we rushed back to the car, hightailed it for home, tossed him in the shower and gave him a dose of allergy medicine. The very important medicine that I forgot to hand out.  DUH!

Two swollen eyes, one bloody nose, and a partridge in a . . . I mean, sneezing fit later and I promised not to forget it ever again.   


Maybe tomorrow will be better.

Sunday, June 20, 2010

Remebering My Dad~ Thanks For The Memories

Remembering my dad~ Ray Purscelley 1919-2008

There are certain things that remind me of my dad. These memories, I hope to pass on
to my boys, Jack and Joe.

I know Dad's voice, touch, and presences is fading from their young minds. But I hope to bring him to life by pointing out the little things that were so much a part of him. If I don't then my dad's life will die with me.

Sometimes at night,when the windows are open we can hear a far off train whistle.
I always stop and I tell my boys to think of Grandpa Ray.
My dad was one of those teenagers who road the rails
during the Great Depression.  A wonderful documentary
on this is called Riding The Rails~ An American Experience.


When we camp in Central Oregon I tell them of the summers spent fishing and swimming on the Deschutes River. To this day things I cherish are warm summer evenings in the
high desert of Central Oregon and the sound of coyotes.

The Deschutes River. Ahhh, so many memories of this cold beautiful river.
It is absolutely the best river to swim in. Its coolness is very much appreciated on a hot day. We love rafting and floating down this river. The surrounding landscape feels like home to me. 

So here's to you dad. I miss you very much. And as my boys favorite movie star, Bob Hope, sang~

Thanks For The Memories.

Tuesday, June 15, 2010

Fireworks Bouquet


I was messing around with ideas for 4th of July decorations and come up with this easy inexpensive swell Fireworks Bouquet.

You'll need:

1. 4th of July pom poms
       * They are a $1.00 a bag at Jo-Ann Fabric
2. Glue Gun
3. Blue painters tape
4. Stem Wire
       *Also found at Jo-Ann Fabric in the floral department.
5. Wire Cutters
Hold on to your hats this is so easy~ Just place a dab of hot glue on either a cluster of 3 pom poms or a single pom pom. Hold tight to the wire for several seconds. Once cool the poms will be secure.

For added interest cut the wire at varying lengths to create depth in your bouquet.

Now visualize how fireworks fall from the sky. Some are graceful with wide arches, some drop suddenly. With this in mind bend the wire accordingly. Remember to bend some and keep some fireworks shooting straight up to the sky.

Once you have done the bending, cluster the different fireworks together and wrap with tape so the wires don't twist around in the vase. I had to stuff my vases with tissue so the wire stood up the way I wanted them to stand. 

Now you are done. 
Enjoy 


Monday, June 14, 2010

Renaissance Faire Was A Blast!

The Renaissance Faire is over all the armor is put away for another year.
.

But it was a wonderful event. The kids really got into it. So much fun.

 The knights battling was one of the many highlights.
My contribution was making signs for the refreshments, such as "The Kings Own Cheese Pie" for the pizza, or "Off With Your Bread Croissant's" and "Fare Thee Well Pepperoni Sticks". I had fun with the titles. Can you tell?


Friday, June 11, 2010

A New Twist For Clip-On Earrings

I have several sets of clip-on earrings that my mother-in-law gave me. I tried wearing them but they hurt my ears.  I didn't want to get rid of them so I turned them into really cool vintage rings. The swell thing is you get two rings out of the clip-on earrings, so you can make one for yourself and one to give away as a gift.

Here's how you can do the same

Your supplies:
E-6000 glue
Ring Blanks- These are hard to find but Jo-Ann Fabric has them from time to time. When you see them buy them. Stocking up is always a swell idea. You can also get them on Etsy or at The Perfect Bead, http://www.perfectbead.com/catalog/Ring_Blanks-3-1.html
*Button Shank Remover- from Jo-Ann Fabrics
*Nail File Or Sandpaper

Once you have your supplies ready use your shank remover to snap off the clip part of your clip-on earring.
Next smooth any rough edges with the nail file or sandpaper


Put a dot of E-6ooo on your ring blank and attach it to the clip earring.


Prop up the ring so it can dry straight up. The glue takes awhile to set and is slippery. It takes a good couple
of hours to dry so keep an eye on it so the ring blank doesn't slip off the clip earring and dry crooked.


Voila!
You are done. So easy and what a great gift for a teacher or a friend. Really swell.

Cheers!


Tuesday, June 8, 2010

~Sugar And Spice And Yummy Cookies~

My sons school is having a Renaissance Faire. I don't think anyone is as excited by this, as me.
I tell ya, I am soooo into this. It's what my focus was in art history. I love everything about the Renaissance.

Sidenote: My son will be happy when its over so his wacko mom can calm down.

It's not like I'm going to go crazy and start attending Renaissance Faire's dressed in long gowns, stomachers, a gable on my head, and nether hose on my legs. Geez! Come on. I'm not that into it.

But it has been fun watching Jack learn about this period in more depth than elementary school. His first assignment was to complete a project on a famous person of that time. He chose, Brunelleschi a famous architect (everyone remember that name it's a good one to drop into conversation at a dinner parties).

Brunelleschi invited perspective. He was a genius but not as well know amongst none history buffs, so toss his name into convo and listen to the sighs of wonder and awe at your intelligences. There are so many geniuses at this time. He seems to be over look when you think of how much press Michelangelo and Leonardo get.

Next: for the actual faire Jack had to decide who he wanted to be. He in proud to say he is the wealthiest man in Lisbon. He is a spice merchant with the finest selection of spices this side of Venice.

While he was gathering his spices I pushed my way into his project and started learning about the Spice Islands and what this meant to the people of Europe at this time.

Did you know pepper was traded like gold? And nutmeg was more important than most spices because it was thought to cure the plague.

Well, one thing lead to another which lead to a cookie and I decided to make these cookies with our left over spices. They are my boys favorites.

Molasses Honey Ginger Cookie~ You haven't had a cookie as good as these babies. I even ground my own spices and ohhhhh the smells and the fresh taste of the cookies was doubled.


I thought I would share:

1 cup shortening
1 cup sugar
1/2 cup molasses (dark or light)
1/2 cup honey
2 eggs yolks

4 cups all purpose flour
1 tsp. baking soda
2 tsp baking powder
1 tsp salt
1 tablespoon cinnamon
2 tsp ground cloves
2 tsp ground ginger
1 tsp ground nutmeg

Cream together the shortening, sugar, molasses, and honey in an electric mixer. Add egg yolks. Mix well

Sift together the flour, baking soda, baking powder, salt, and spices. Stir into the shortening mixture. Wrap the dough in plastic and chill well.

Once chilled take out of fridge and roll into small balls, then roll into granulated sugar. Place on a slightly greased cookie sheet. Press down with a fork.

Preheat over to 350. Bake cookies for 8-10 min. As usual my advice is to under bake. Only 8 min.

They are brilliant.

Friday, June 4, 2010

Re-purpose Glass Jars-What Surrounds Me Inspires Me


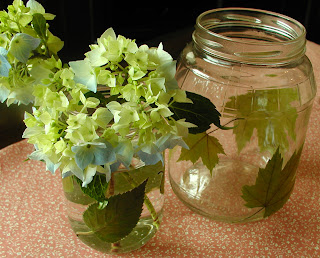
While I was emptying my refrigerator, cleaning, and recycling the glass jars, I suddenly thought they would look really cool as vases or candleholders. The glass jars clear smooth surfaces just begged for something.  

Once again the verdant vegetation that surrounds me inspired theses vases. I first had Joe pick some pretty green leaves. We pressed them between wax paper in a heavy stack of books for one days, not enough to completely dry out but enough to flatten them out.

Then I carefully painted one side of the leaves with Mod Podge including steam and pressed them to a clear dry label free jar. I kept doing this with different size leaves, rotating the direction (stem at the top stem at bottom).

After the leaves dried I carefully coated the outside of the leaves with Mod Podge and let dry. With fingernail polish remover and a cotton swab I cleaned up the edges of the Mod Podge overspill. 

I have used these vases/candle holders around the house and for outside decorating with citronella candles. 

Warning: The look is rough and the leaves darken and may turn different colors of greenish brown and so on but I think the color change is lovely and actually adds to the rustic feel. 

Enjoy

Thursday, June 3, 2010

New Coasters On Etsy

I put my London Herald Coasters from 1798 on Etsy.

Get them while they're hot. 

They turned out really cool. They will be featured along with a tutorial on the website http://www.oneprettything.com/ One Pretty Thing, later this month.

I had some friends over on Sunday and we were reading the coasters. Apparently, most of the S's in the newspaper were, for some reason, turned into F's. Why? We have no idea. Did they not have the letter S at their disposal? But that can't be because there were some S's used in the newspaper.

Anyone have any ideas?

Example: one of the articles was about the Poft-Boy (i'm assuming Post Boy) got robbed by a fingle (single) highwayman. The boy had fmall (small) faddlebags (saddlebags).

We were laughing so hard. Just reading the article outloud (with a lisp) was quite funny. You get the idea? After a glass or two of wine I supposed everything is funny but his fmall faddlebags ftill make me giggle.

LinkWithin

Related Posts with Thumbnails